Real Time Live Location Tracking
We will make live location tracking using Google Firebase, Here we will see that our live location is updated as soon as the location on the firebase changes. This method is used in live tracking of redbus like applications.
How to upload live location to firebase from android app
Say we have developed and android app and we want to track the location of the device on which our android app is installed. In android part we can upload the location to firebase very easily. We can make background services which will constantly get the location of our android device and constantly upload it to firebase. we are not covering the part of uploading data to firebase from android app. We assume that you can upload the data to firebase from android app, a lot of tutorials are present on google.
Steps of live Firebase Realtime database:
- Create account on Firebase console
- Create a new project.
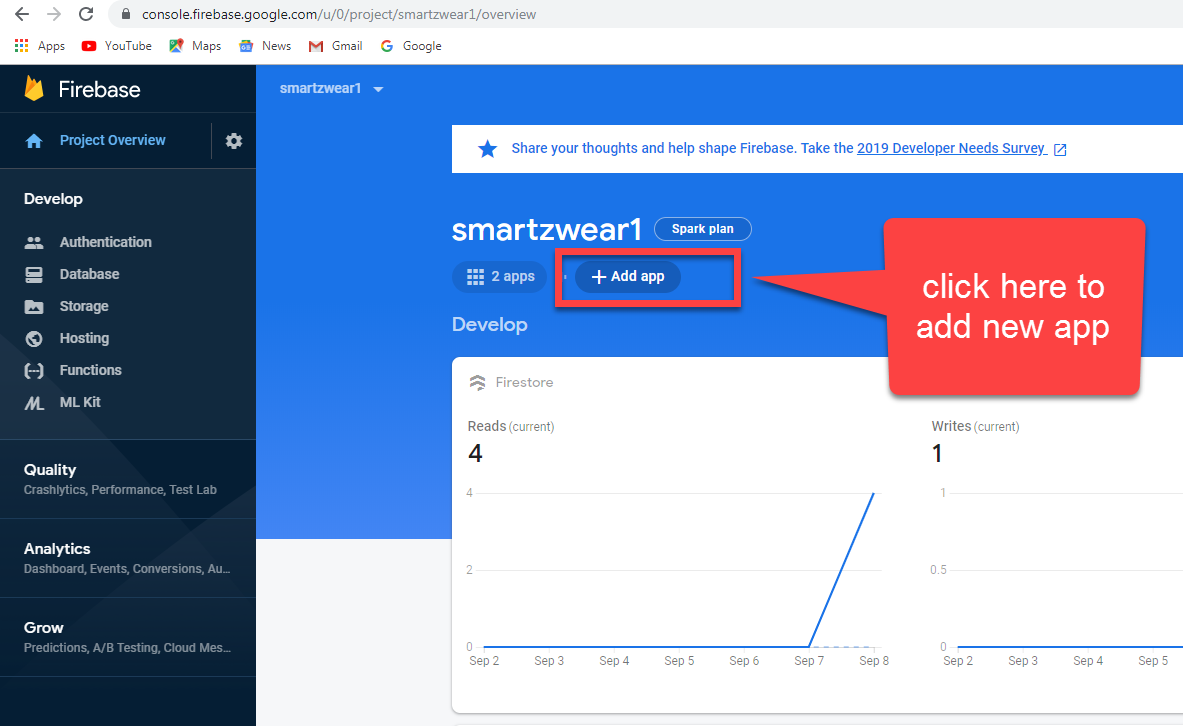
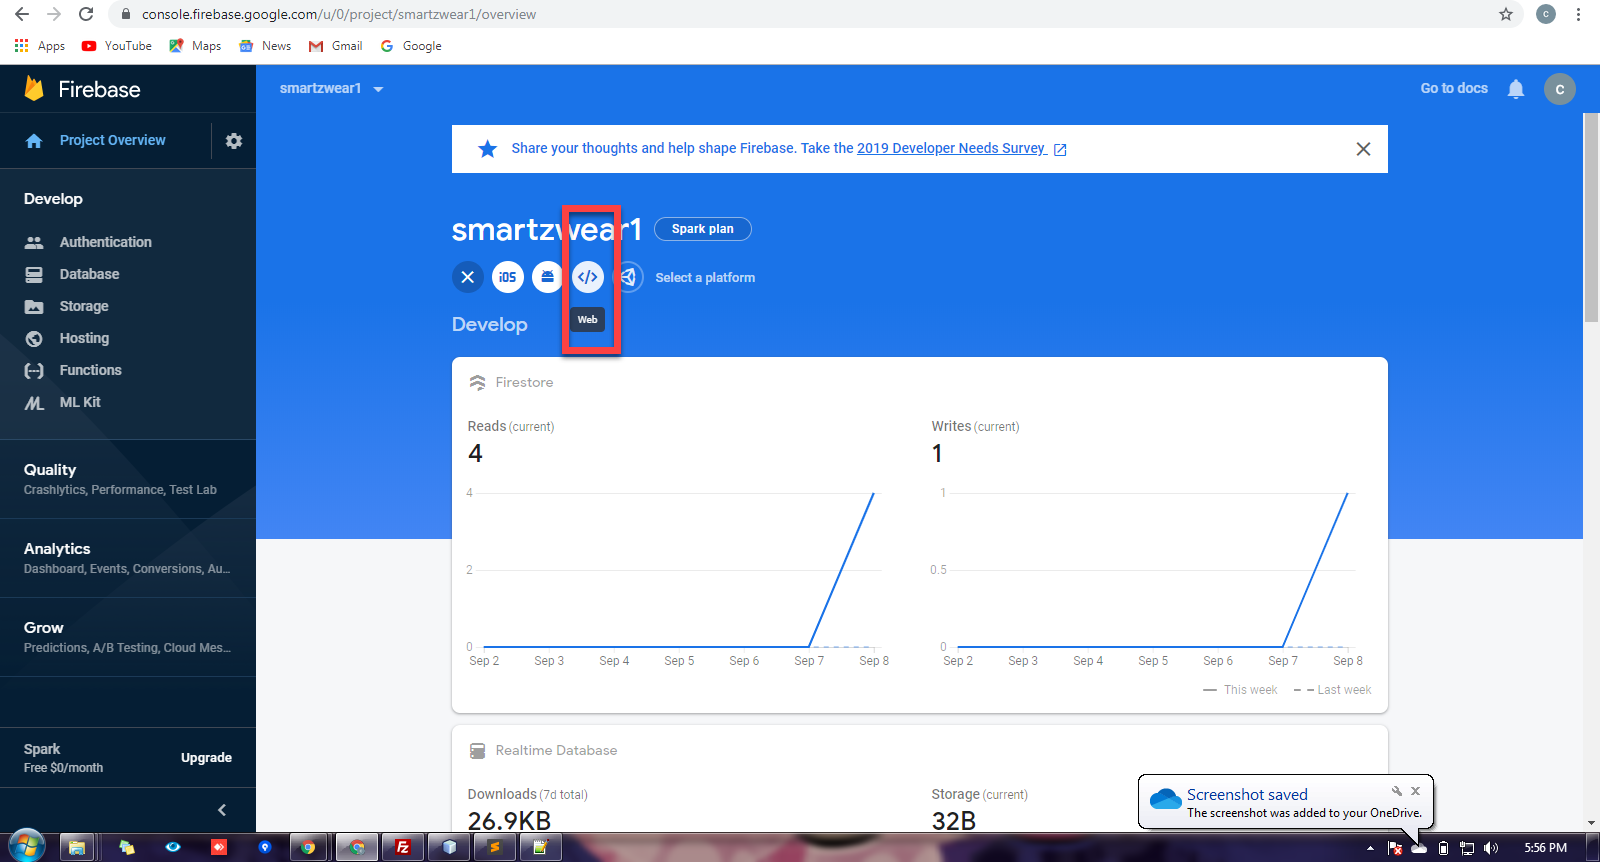
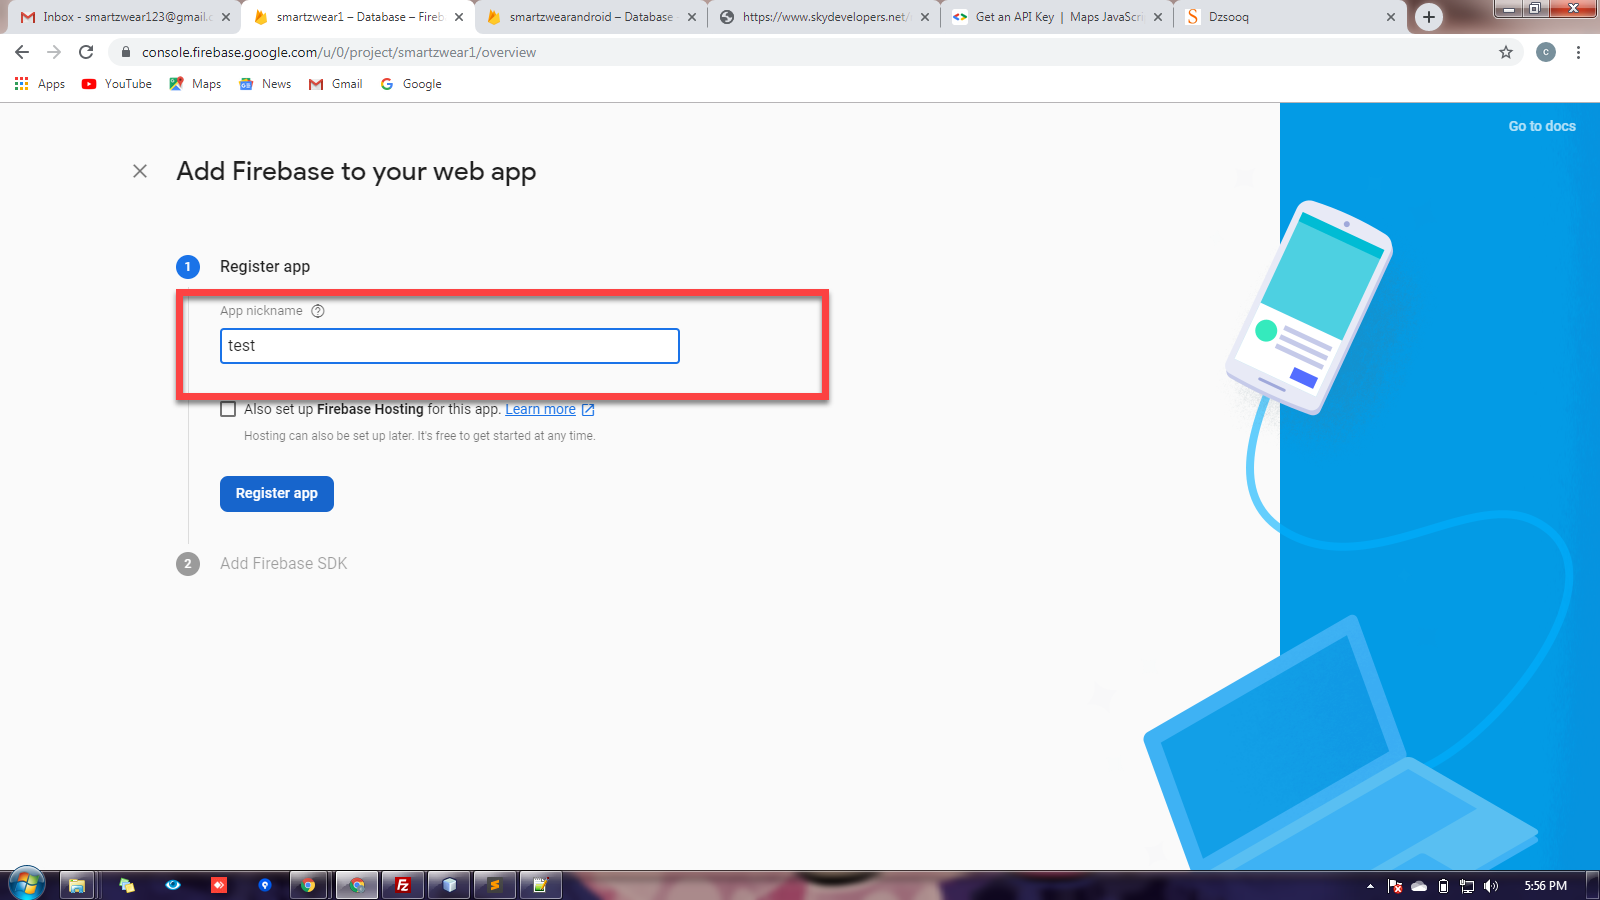
- After creating new project navigate to “add Firebase to your web app”
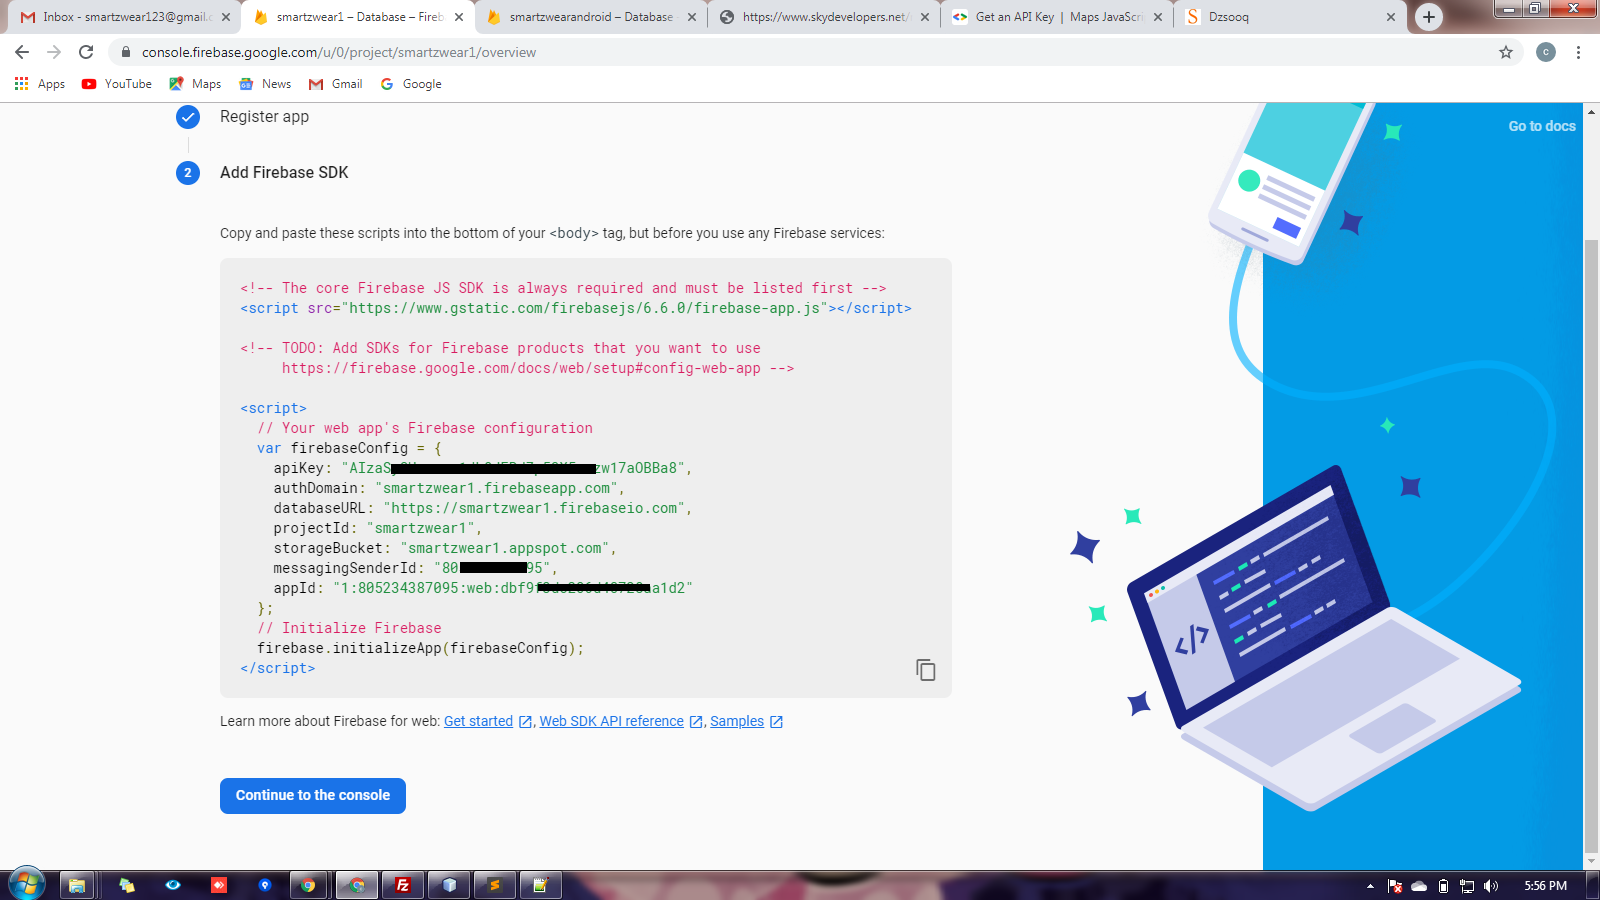
- Once you give it a name, it will show you the JavaScript code live below
- Make your security rules to public for now for testing purpose, I am also adding public security rules, you can copy and paste it to your security rules
 // Replace your Configuration here..
            var config = {
                apiKey: "AIzaSyDbT_HvTONGe5asdfasdOI9pjHtBmhAnsGg",
                authDomain: "smartzwearandroid.firebaseapp.com",
                databaseURL: "https://smartzwearandroid.firebaseio.com",
                projectId: "smartzwearandroid",
                storageBucket: "",
                messagingSenderId: "72322327422",
                appId: "1:724478227422:web:edeb410fsdfa50cc3b639634f"
            };
            firebase.initializeApp(config);
Public Security rules for firebase:
rules_version = '2';
service cloud.firestore {
  match /databases/{database}/documents {
    match /{document=**} {
      allow read, write;
    }
  }
}
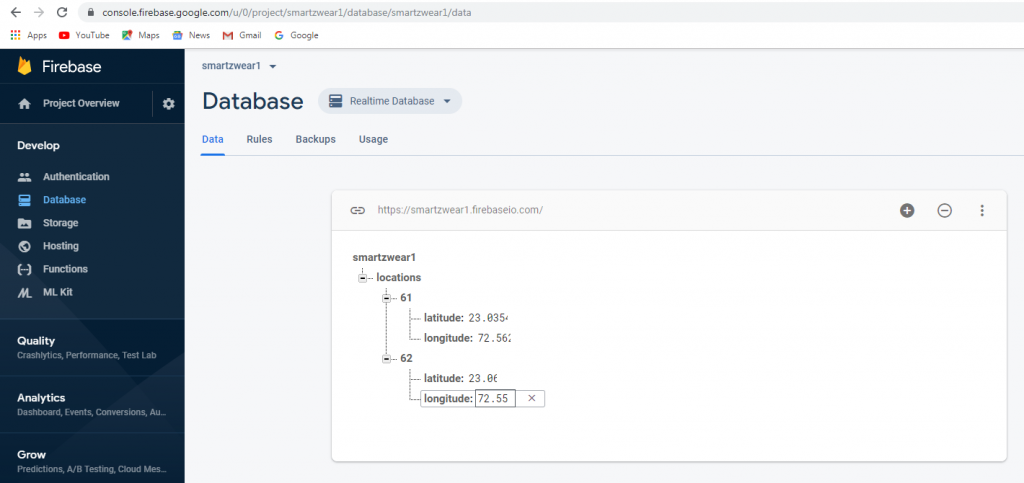
Adding data to firebase
now we have to add some users and the latitude and longitude of the user’s location. Here we will place some dummy data to test our project. But this is the part which will be updated from android app. Look at the database structure of Firebase real time database below.
Creating a HTML page with google map:
we have to create a HTML page where we will display map and live location on the map, the value of the latitude and longitude will be taken from the Firebase. Below is the code for the html page having google map for live tracking.
<!DOCTYPE html>
<html>
    <head>

        <style>
            #map {
                height: 100%;
            }

            html, body {
                height: 100%;
                margin: 0;
                padding: 0;
            }

            #over_map {
                position: absolute;
                top: 10px;
                left: 89%;
                z-index: 99;
                background-color: #ccffcc;
                padding: 10px;
            }
        </style>
    </head>

    <body>
        <div id="map"></div>

        <div id="over_map">
            <div>
                <span>Live Tracing:1 </span><span id="cars">0</span>
            </div>
        </div>


        <!-- jQuery CDN -->
        <script src="https://ajax.googleapis.com/ajax/libs/jquery/3.3.1/jquery.min.js"></script>


        <script>

            // counter for online cars...
            var cars_count = 0;
            // markers array to store all the markers, so that we could remove marker when any car goes offline and its data will be remove from realtime database...
            var markers;
            var map;
            function initMap() { // Google Map Initialization...
                map = new google.maps.Map(document.getElementById('map'), {
                    zoom: 8,
                    center: new google.maps.LatLng(23.034, 74.56),
                    mapTypeId: 'terrain'
                });
            }


        </script>
        <script async defer src="https://maps.googleapis.com/maps/api/js?key=AIzaSyC8HdkhY4Iy8jo4bM0uIJVnaekAw7A0Xm8&callback=initMap">
        </script>

    </body>
</html>
Adding Firebase to the HTML codes
We will add Firebase connectivity to the this html page, and we will receive the latitude and longitude from Firebase RealTime database. Once we receive the lat and lng we update the map marker with the current latitude and longitude. Before adding new marker we will clear the previous marker.
Since once you have added the latitude & longitude code, it will automatically get updated as the location will be updated on the Firebase.
We have categorized the users with id for multiple users, we pass the id as GET request on url. We get the id of the user and show the tracking for that user.
Below is the complete HTML code :
<!DOCTYPE html>
<html>
    <head>

        <style>
            #map {
                height: 100%;
            }

            html, body {
                height: 100%;
                margin: 0;
                padding: 0;
            }

            #over_map {
                position: absolute;
                top: 10px;
                left: 89%;
                z-index: 99;
                background-color: #ccffcc;
                padding: 10px;
            }
        </style>
    </head>

    <body>
        <div id="map"></div>

        <div id="over_map">
            <div>
                <span>Live Tracing:1 </span><span id="cars">0</span>
            </div>
        </div>


        <!-- jQuery CDN -->
        <script src="https://ajax.googleapis.com/ajax/libs/jquery/3.3.1/jquery.min.js"></script>
        <!-- Firebase -->
        <script src="https://www.gstatic.com/firebasejs/4.12.1/firebase.js"></script>
        <script>
            // Replace your Configuration here..
            var config = {
                apiKey: "AIzaSyDbT_HvTONGe5jj7LVVOI9pjHtBmhAnsGg",
                authDomain: "smartzwearandroid.firebaseapp.com",
                databaseURL: "https://smartzwearandroid.firebaseio.com",
                projectId: "smartzwearandroid",
                storageBucket: "",
                messagingSenderId: "724478227422",
                appId: "1:724478227422:web:edeb410bf50cc3b639634f"
            };
            firebase.initializeApp(config);
        </script>

        <script>

            // counter for online cars...
            var cars_count = 0;
            // markers array to store all the markers, so that we could remove marker when any car goes offline and its data will be remove from realtime database...
            var markers;
            var map;
            function initMap() { // Google Map Initialization...
                map = new google.maps.Map(document.getElementById('map'), {
                    zoom: 8,
                    center: new google.maps.LatLng(23.034, 74.56),
                    mapTypeId: 'terrain'
                });
            }


             function ShowLocation(lat,lng) {

            if(markers!=null){
                markers.setMap(null);
            }


                var uluru = { lat: lat, lng: lng };

                var marker = new google.maps.Marker({
                    position: uluru,
                    title:'Live Location',
                    map: map
                });
                map.setZoom(17);
                map.panTo(marker.position);
                markers = marker; // add marker
            }


            // get firebase database reference.
            var loc_ref= firebase.database().ref("locations");
    //------------------------------------------------------------------------------------
            loc_ref.on('value',gotData,errData);
            var curr_lat; var curr_lng;
            function gotData(data){
                console.log(data.val());
                var locations= data.val();
                var user_id = getUrlParameter('id');
                console.log("user_id is: "+user_id);
                curr_lat=locations[user_id].latitude;
                curr_lng=locations[user_id].longitude;
                console.log("current_latitude:"+parseFloat(curr_lat)+" && current_longitude: " +parseFloat(curr_lng));
                ShowLocation(parseFloat(curr_lat),parseFloat(curr_lng));
            }

            function errData(err){
                console.log('error: '+err);
            }
    //---------------------------------------------------------------------------------------
        var getUrlParameter = function getUrlParameter(sParam) {
            var sPageURL = window.location.search.substring(1),
                sURLVariables = sPageURL.split('&'),
                sParameterName,
                i;

            for (i = 0; i < sURLVariables.length; i++) {
                sParameterName = sURLVariables[i].split('=');

                if (sParameterName[0] === sParam) {
                    return sParameterName[1] === undefined ? true : decodeURIComponent(sParameterName[1]);
                }
            }
        };

        </script>
        <script async defer src="https://maps.googleapis.com/maps/api/js?key=AIzaSyC8HdkhY4Iy8jo4bM0uIJVnaekAw7A0Xm8&callback=initMap">
        </script>

    </body>
</html>
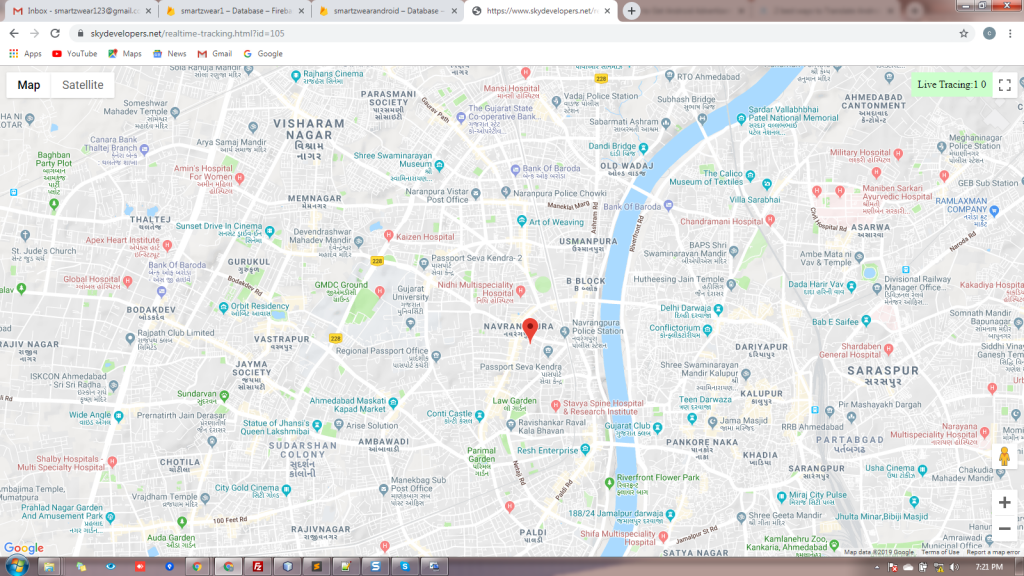
Below is how the live tracking looks:
The article is written by Skydevelopers backend team


